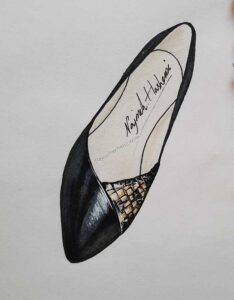
In previous articles, you learned the common mistakes in shoe design and drawing from three-quarter and side view.
Now we know about drawing shoe design from top view.

DRAWING THE TOP VIEW
Important points in shoe design from top view
For the top or toe section of the shoe, you need to draw from straight above the toe tip,
then add a bit of length to the shoe to make up for the foreshortening that takes place as the shoe rises up from the arch of the foot to the heel.
The higher the heel, the more length you will need to add.
It is not usually necessary to draw the whole shoe when drawing a toe detail
but if you do, make sure the back heel curves comfortably around.
Initial Sketch
Begin by sketching the top of the shoe on a piece of tracing paper.
Notice the harder angle on the arch side of the foot and the smoother curve of the outside view .
The arch-side bulge will be slightly lower than the bulge on the outside of the foot.
Correcting initial sketch
After refining the under drawing, place it under a piece of marker paper.
Begin to draw the outline of the shoe with a darker- colored pencil than the finished local color of marker.
Keep in mind the symmetrical nature of most footwear and keep the perspective straight.
drawing shadow patterns
Start to lay in your shadow tones.
Light your shoe from a single light source.
Notice how the light and dark patterns follow the side structure of the foot.
Keeping to this form will make your shoes easy to read and look structurally sound.
The more reflective the surface, the higher the contrasts between lights and darks.
Keep the inside sole of the shoe lighter than the outside upper so the inside does not distract from the design and allows the silhouette of the shoe to dominate.
Adding details
Finish the illustration by markering the local color on the back of the drawing.
And then adding the design details to the front (snakeskin and highlights).
In this illustration, the highlight on the toe was created by missing out that area when marker color was applied.
I hope this tutorial was useful for you.
Practice by memorizing and reviewing the points made, and become more proficient in what is said by practicing more.
For more specialized trainings based on university courses, you can use the educational videos.
جستجو
You can also become a member of the Telegram channel to be informed about the latest content published on this website: @Nhashemi.shoe.designer
نوشته های تازه
Tags
دسته ها
- Najmeh Hashemi (23)
- Shoes & Designers (12)
- Shoe Designers (9)
- Shoe Museum (2)
- Tutorial (23)
- Footwear Design (14)
- Shoe Illustration (9)


2 Comments. Leave new
Thanks for everything!
you’re welcome